As we discussed here, you may host your website on an inexpensive VPS with a static public IP address. Most VPS providers charge a few euro per month. However, the machines they provide are pretty basic, suitable for a simple static website or even a CMS like WordPress but unfit for more demanding purposes. In this article, I will try to list some alternative ways to use a home server (like an old dismissed PC or a raspberry pi) the same way you would use that VPS.
Why should I use a local machine?
There may be many reasons to host a web service on a home server:
- you have got some recycled or cheap hardware which is way better than what is offered by your VPS provider (especially in terms of disk space);
- you want your data to be stored in a safe place, where nobody except for you has physical access;
- you need a custom hardware configuration to ensure reliability and prevent data loss (e.g. RAID 5);
- you could use a faster connection from your LAN, when you are connecting from home;
- a combination of the above, and many more.
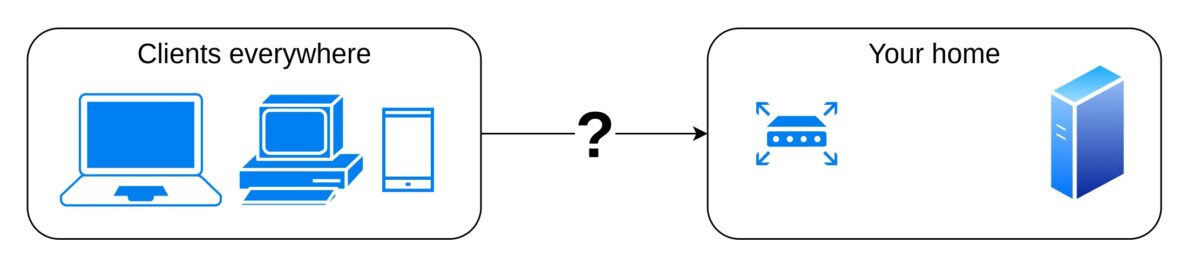
What do I need to make my server available on the internet?
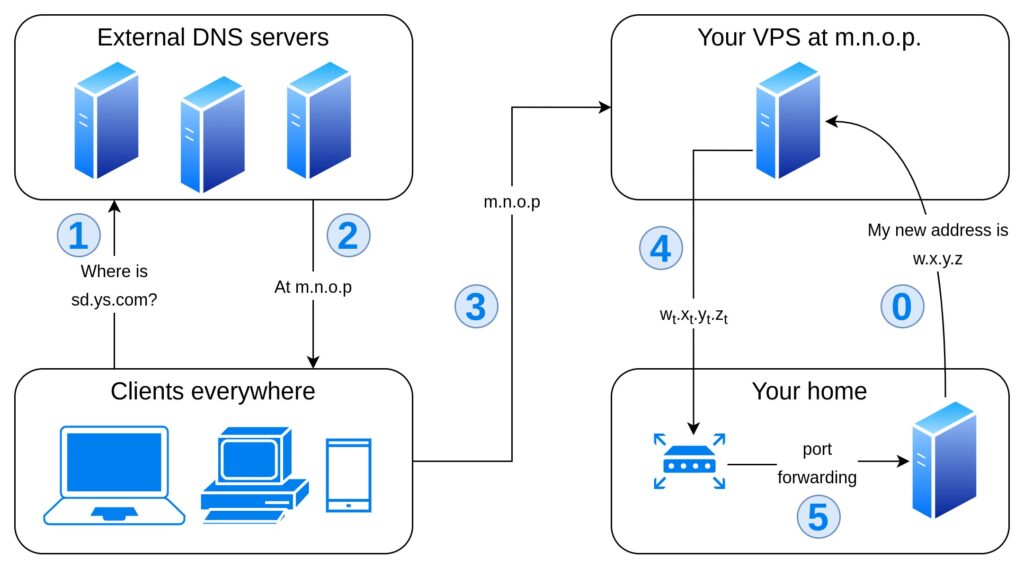
There are many ways to allow clients to find your server from anywhere on the internet. You may choose one of these options according to the service(s) you own and the one(s) you are willing to acquire.
In the flowchart above, if option n is feasible then you may opt for all options m, where m > n. To help you navigate the flowchart and understand the pros and cons of each option, here is a comparison of these solutions.
- Public static IP address, DNS record and port forwarding
- Public dynamic IP address, host your own public DNS server on a VPS
- Public dynamic IP address, host a local private resolving service on a publicly-available VPS
- You are behind a NAT, use a tunneled connection to the VPS and redirect all traffic through it
| Your home IP address | VPS | VPN | DNS | |
| 1 | Public static | – | – | External |
| 2 | Public dynamic | YES | – | Own, public |
| 3 | Public dynamic | YES | – | Own, local |
| 4 | Dynamic and behind NAT | YES | YES | – |
| Pros | Cons | |
| 1 | Easiest to set up, always available, managed DNS records, direct connection | Obtaining a public static IP address is not always feasible |
| 2 | No need to have a public static IP address, direct connection with clients | VPS needed, need to run a DNS server yourself, some ISPs won’t give you a public IP address |
| 3 | No need to have a public static IP address or to run a public DNS server | VPS needed, indirect connection with clients (all traffic must be forwarded), a dynamic public IP address is still needed |
| 4 | No need to have a public static or dynamic IP address or to run a DNS server; always available | VPS needed, own VPN needed, indirect connection with clients (all traffic must be forwarded) |
Option 1
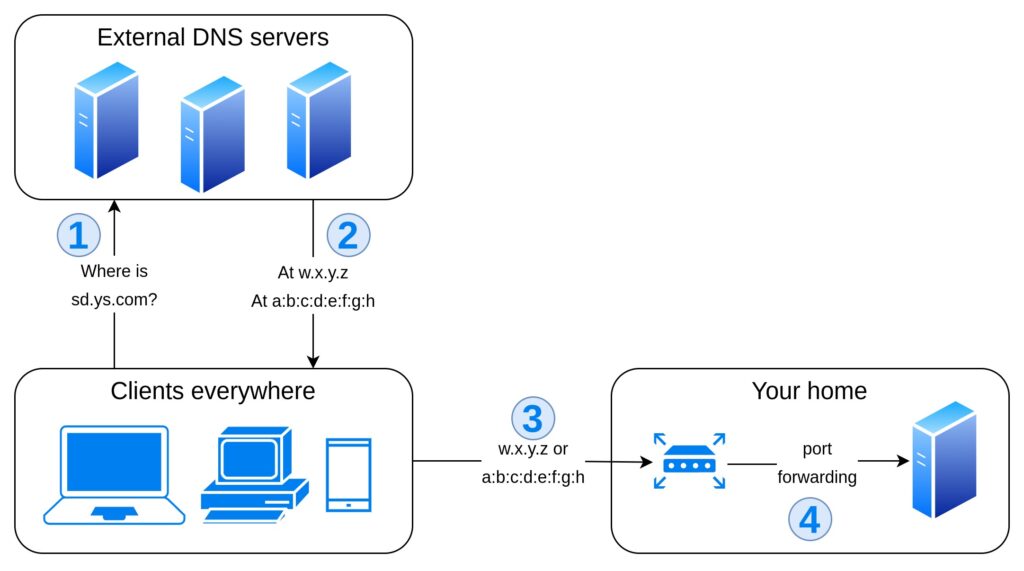
Obtaining a public static IP address is not so simple and cheap: since IPv4 addresses are limited in number (232 total addresses, i.e. about 4 billion) and many have already been taken, internet service providers (ISPs) usually assign dynamic addresses to their clients, and they often put many routers behind the same NAT, which means that even knowing the IP address of your machine at this moment does not make it available at that address from the outside. Things might change as soon as IPv6, with its 2128 addresses, takes over, but that moment is not scheduled yet.
However, if you happen to own a public static IP address for your home connection, you may run your home server at subdomain.yoursite.com with ease.
- First thing to do is to register DNS records associating your (sub)domain with your public static address. There are many hosting providers willing to sell you a domain, each of them with slightly different conditions. In general, you just need to associate a (sub)domain with the corresponding address, and this should be very cheap (10 – 15 euro per year at the time of writing). Additional services which may be useful but not necessary are DNS flood protection, redundancy on many DNS servers, IPv6-reachable DNS servers. Other services will increase the cost but are not impacting on the purpose of this small guide.
- A record:
*.yoursite.com > w.x.y.z - AAAA record:
*.yoursite.com > a:b:c:d:e:f:g:h - You may want to register specific subdomain(s), e.g.
www servicename othername. This is not necessary, since the wildcard record (*.) will include all subdomains of yoursite.com
- A record:
- Then you have to set up your router to allow incoming connections and forward the ports of interest (typically 22 for SSH/SFTP, 80 for HTTP and 443 for HTTPS).
- Go to your router configuration page (usually it is located at http://192.168.0.1 or http://192.168.1.1, but each router may have a different gateway address).
- Allow incoming connections to the desired ports (there may be a “firewall” section in your router configuration page).
- Assign a static address on the local network to your server: go to the MAC-IP Bind section, identify your server’s MAC and bind it to an address of your choice. Every time the home server will connect to the router, the latter will assign the same IP address to the former.
- Set up port forwarding: the incoming traffic on port x will be redirected to your home server (there should be a “port forwarding” section in your router configuration page).
- Make sure to open the required ports on your server; if you are running Ubuntu server and use ufw as firewall, to open port 22 you have to type
ufw allow 22.
When a user targets subdomain.yoursite.com, they will resolve the IP address of your router, which will forward the request to your server. Different subdomains may point to different routers, and each router may forward different ports to different machines; on the same machine, a web server (like nginx or apache) may respond to the requests or act as a reverse proxy and forward different (sub)domains to different sockets, local services or even other machines.
The traffic between the clients and your home server, after the initial DNS query (which may be cached), will be direct (except for the usual routing process) and whenever your machine is running, your router is connected to the internet and the DNS servers are working properly, your machine will be available at subdomain.yoursite.com
Option 2
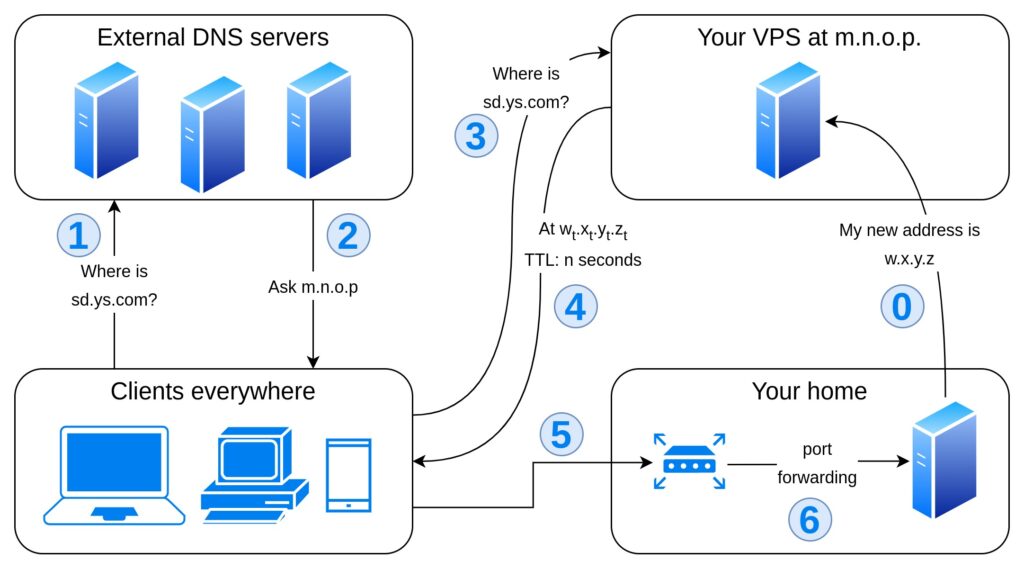
If you are a private customer, your ISP won’t probably sell you a public static IP address even if you are willing to pay for it. But if you are lucky enough to be assigned a public dynamic IP address, you may follow these instructions to make your home server available at subdomain.yoursite.com.
- Check that your IP is really public: visit your router configuration page and check that your WAN IP address does not start with 192, 10, 172, 1 or 255. Also check that the WAN IP is the same as shown by external services e.g. https://whatismyipaddress.com/. If so, congratulations! Otherwise, check out option 4.
- You need a VPS with a public static IP address; the cheapest machine will do, it will just work as a DNS authoritative nameserver for your domain and point to your home server. Beware that hosting your own nameserver exposes you to DNS flood attacks (among others); you should update your software, configure your firewall and be careful; however, if your project is just a little private initiative and you have not much to lose this way, this is not a big deal.
- You must register your VPS as authoritative DNS nameserver for your domain; make sure your domain name registrar lets you configure your own DNS servers before buying the domain
- Example configuration:
dns1.yoursite.com > m.n.o.p; dns2.yoursite.com > m.n.o.p(the registrar often requires at least two distinct DNS servers, but they may be located at the same IP address on the same machine). m.n.o.p must be the static public IP address of your VPS (you may register your IPv6 address as well).
- Example configuration:
- Set up a DNS authoritative nameserver on your VPS. If you aren’t familiar with that, see the section below.
- Make your home server update the DNS record automatically. The update interval must be similar to the time to live (TTL) of the record. The shortest these intervals, the shortest gap between IP changes and DNS record updates but the highest load of word for your DNS nameserver. Please note that there will always be a span of time during which your server will be unavailable when your IP changes. However, this should not occur so often (but it depends on your ISP and there is nothing you can do about it). If you don’t know how to do it, here is an example.
- Set up port forwarding (see above for details)
When a user targets subdomain.yoursite.com, they will be told the IP address of your VPS that is running a DNS service, which will provide a DNS record with a short TTL pointing to the current public IP address of your router at home. The router will forward all incoming traffic to your home server, which will continuosly update the DNS record on your VPS.
The traffic between the clients and your home server will be direct, but given the short time to live of the DNS records the clients will have to make many more DNS queries. Your machine will be available at subdomain.yoursite.com, except for the gaps between IP change, DNS update and previous record expiry.
Set up an authoritative DNS nameserver
The following instructions have been followed on Ubuntu server 20.04 LTS, but they should work for other distributions and operative systems with the due adaptations. This is meant to guide an inexpert user, if you can run a DNS server in any other way you may skip this section.
In the code blocks below, these placeholders are used:
m.n.o.pis your VPS public IPv4 addressi:j:k:l:m:n:o:pis your VPS public IPv6 addressw.x.y.zis your home server IPv4 address (local or public, depending on the DNS server type)a:b:c:d:e:f:g:his your home server IPv6 address (local or public)yoursite.comis your domainsubdomain.yoursite.comis your subdomain- In bind9 zone file syntax, you will see some dots after your domain name in some (not all!) circumstances. Beware of dots!
- In the SOA line,
hostmaster.yoursite.com.is an email address (the @ is replaced by a dot in bind9 syntax)
# Install bind9
sudo apt install bind9 bind9-utils

sudo nano /etc/bind/named.conf.options  # See below
ddns-confgen -s yoursite.com  # Create a private key to edit your DNS record remotely. Follow the instructions printed by this command
sudo nano /etc/bind/named.conf.local  # See below
sudo -u bind nano /var/lib/bind/db.yoursite.com  # See below

sudo named-checkconf -z /etc/bind/named.conf  # Check your configuration; fix any error
sudo systemctl start bind9
These are the configuration and zone files mentioned above:
## == /etc/bind/named.conf.options == ##
options {
	directory "/var/cache/bind";
	dnssec-validation auto;
        listen-on    port 53  { any; };  # You can allow specific clients  to make requests
	listen-on-v6 port 53  { any; };  # IPv6 configuration
        allow-query           { any; };  # You may allow only local requests (but your nameserver won't be public then; do this if you just need a local resolver and not a public nameserver)
        recursion             yes;
};
## == /etc/bind/named.conf.local == ##
key "ddns-key.yoursite.com" {
algorithm hmac-sha256;
secret "thisisasecret";
};
zone "yoursite.com." {
type master;
file "/var/lib/bind/db.yoursite.com";
update-policy {
grant ddns-key.yoursite.com wildcard *.yoursite.com. ANY;
};
};## == /var/lib/bind/db.yoursite.com == ##
$ORIGIN yoursite.com.
$TTL 60 ; time to live in seconds
@ IN SOA dns1.yoursite.com. hostmaster.yoursite.com. (
1 ; Serial number (increment after each manual change)
3600 ; Refresh [1h]
600 ; Retry [10m]
86400 ; Expire [1d]
3600 ) ; Negative Cache TTL [1h]
;
@ IN NS dns1.yoursite.com.
@ IN NS dns2.yoursite.com.
@ IN A w.x.y.z
AAAA a:b:c:d:e:f:g:h
;
dns1 IN A m.n.o.p
AAAA i:j:k:l:m:n:o:p
dns2 IN A m.n.o.p
AAAA i:j:k:l:m:n:o:p
subdomain IN A w.x.y.z
AAAA a:b:c:d:e:f:g:h
* IN A w.x.y.z
AAAA a:b:c:d:e:f:g:h
;Update your DNS record remotely
On your home server, store the ddns key in a file (e.g. /home/user/ddns/yoursite.key) and create a script like the one below (e.g. /home/user/ddns/run_me.sh). You can create a systemd service or schedule a crontab task to update periodically your public dynamic IP address.
## == /home/user/ddns/run_me.sh == ##
# Store your current IP address in the variable $MYIP
MYIP=$(dig +short myip.opendns.com @resolver1.opendns.com)

# Set the appropriate parameters (see above)
KEY="/home/user/ddns/yoursite.key"
NS=yoursite.com
DOMAIN=subdomain.yoursite.com.
ZONE=yoursite.com.

# Update remotely using the key in keyfile
nsupdate -k $KEY -v << EOF
server $NS
zone $ZONE
update delete $DOMAIN A
update add $DOMAIN 30 A $MYIP
send
EOF
## == /home/user/ddns/yoursite.key == ##
key "ddns-key.yoursite.com" {
algorithm hmac-sha256;
secret "thisisasecret";
};
# This must be the same key as root@yourVPS:/etc/bind/named.conf.local## == /etc/crontab == ##
# Update DNS record every minute forever
# [...] other cron jobs
* * * * * user /home/user/ddns/run_me.shOption 3
If you don’t want to run a publicly available DNS server (or maybe you can’t, possibly due to your VPS provider’s firewall rules or due to your registrar’s DNS policies) you can still use a reverse proxy to pass incoming traffic to you locally-resolved (sub)domain. Just like with option 4, all traffic will be redirected through your VPS (causing delays and counting as internet traffic, which is often metered by VPS providers), but unlike option 4 no VPN is required.
- Check that your home IP address is public (see above).
- You need a VPS with a public static IP address; the cheapest machine will do, it will just work as a local resolver for your subdomains and forward all incoming traffic to your home server.
- Register a wildcard DNS record with your domain provider to make all subdomains of yoursite.com point to your VPS. Just follow these instructions, with the public static IP of your VPS (you may run
ifconfigon the VPS to get it). - Run a local resolver to make
subdomain.yoursite.compoint to your home server’s current public IP address. If you don’t know how to do it, I suggest that you follow these instructions, remembering that there is no need to allow every client to query your nameserver, it just has to be available on the very machine it is running on. - Make your home server update the DNS record automatically (see above for an explanation or below for an example).
- Make your reverse proxy redirect all the incoming traffic on the ports of interest for a given subdomain to your locally-resolved subdomain. If you need help doing this, see the section below. If a communication is encrypted (e.g. HTTPS on port 443), the decryption should happen only on the target (your home server), the VPS should forward packets as a black box, without even knowing anything about them but their destination.
- Set up port forwarding (see above for details)
When a user targets subdomain.yoursite.com, they will be told the IP address of your VPS. A reverse proxy will resolve the destination using a local DNS nameserver and forward all incoming traffic to the address resolved this way. The local nameserver will provide a DNS record with a short TTL pointing to the current public IP address of your router at home. The router will forward all incoming traffic to your home server, which will continuosly update the local DNS record on your VPS.
The traffic between the clients and your home server will be indirect, the VPS acting as a “relay”. Your machine will be available at subdomain.yoursite.com, except for the gaps between IP change, DNS update and previous record expiry.
Redirect traffic with a reverse proxy
These steps were tested using nginx 1.18.0 (compiled with ngx_stream_core_module, available for 1.9+) on Ubuntu server 20.04 LTS, but they could be followed on any OS with any reverse proxy, given the proper adjustments.
In this example, we will build a website with two domains (www.yoursite.com and subdomain.yoursite.com). The first domain will be a static website on the VPS server, the second domain a static website on the home server. The public DNS record will point to the VPS for all subdomains.
### === Configuration on the VPS server === ###
## == /etc/nginx/nginx.conf == ##
user www-data;
worker_processes auto;
pid /run/nginx.pid;
include /etc/nginx/modules-enabled/*.conf;
# [...]
stream {
    include /etc/nginx/stream.d/*;
}
http {
        # [...]
	include /etc/nginx/mime.types;
	include /etc/nginx/conf.d/*.conf;
	include /etc/nginx/sites-enabled/*;
}

## == /etc/nginx/stream.d/forward == ##
resolver 127.0.0.1 valid=1s;  # Replace with the address of your local nameserver; remove if no resolver is needed
map $ssl_preread_server_name $name {
    subdomain.yoursite.com   subdomain.yoursite.com:443;  # Replace with the name of an upstream block or with a static IP address (e.g. a local address or a VPN address)
    default                  backend;
}

upstream backend {
    server 127.0.0.1:4443;
}

server {
    listen      443;
    proxy_pass  $name;
    ssl_preread on;
}

## == /etc/nginx/sites-enabled/yoursite.com == ##
# Redirect HTTP traffic for subdomain to home server
server {
  listen 80;
  listen [::]:80;
  server_name subdomain.yoursite.com;
  location / {
    resolver 127.0.0.1:53;  # Replace with the address of your local nameserver; remove if no resolver is needed
    set $upstream_endpoint http://subdomain.yoursite.com;
    proxy_pass $upstream_endpoint$request_uri;  # If you remove the resolver, replace $upstream_endpoint with a static IP address (e.g. a local address or a VPN address)
  }
}

# Redirect all HTTP traffic to HTTPS
server {
  listen 80;
  listen [::]:80;
  server_name www.yoursite.com;
  location / {
    return 301 https://$server_name$request_uri;
  }
}

# When a user browses to https://www.yoursite.com/a/b nginx will try to answer with the file /var/www/www.yoursite.com/a/b, then for file /var/www/www.yoursite.com/a/b/index.html and if none of them exists it will give a 404 error page
server {
  listen 4443 ssl http2;  # 443 is forwarded to 4443 for all domains but `subdomain`, see above
  listen [::]:4443 ssl http2;
  server_name www.yoursite.com;
  ssl_certificate /etc/letsencrypt/live/www.yoursitecom/fullchain.pem;
  ssl_certificate_key /etc/letsencrypt/live/www.yoursitecom.com/privkey.pem;
  root /var/www/www.yoursite.com;
  index index.html;
  location / {
    try_files $uri $uri/ =404;
  }
}
After setting up the VPS server, you can obtain a letsencrypt certificate for subdomain.yoursite.com on your home server. If you run certbot certonly --cert-name subdomain.yoursite.com, your certificate and key should be saved in /etc/letsencrypt/live/subdomain.yoursite.com/.
### === Configuration on the home server === ###
## == /etc/nginx/nginx.conf == ##
user www-data;
worker_processes auto;
pid /run/nginx.pid;
include /etc/nginx/modules-enabled/*.conf;
# [...]
http {
        # [...]
	include /etc/nginx/mime.types;
	include /etc/nginx/conf.d/*.conf;
	include /etc/nginx/sites-enabled/*;
}
## == /etc/nginx/sites-enabled/subdomain == ##
# Redirect all HTTP traffic to HTTPS
server {
  listen 80;
  listen [::]:80;
  server_name subdomain.yoursite.com;
  location / {
    return 301 https://$server_name$request_uri;
  }
}
# When a user browses to https://subdomain.yoursite.com/a/b nginx will try to answer with the file /var/www/subdomain/a/b, then for file /var/www/subdomain/a/b/index.html and if none of them exists it will give a 404 error page
server {
  listen 443 ssl http2;
  listen [::]:443 ssl http2;
  server_name subdomain.yoursite.com;
  ssl_certificate /etc/letsencrypt/live/subdomain.yoursite.com/fullchain.pem;
  ssl_certificate_key /etc/letsencrypt/live/subdomain.yoursite.com/privkey.pem;
  root /var/www/subdomain;
  index index.html;
  location / {
    try_files $uri $uri/ =404;
  }
}
Option 4
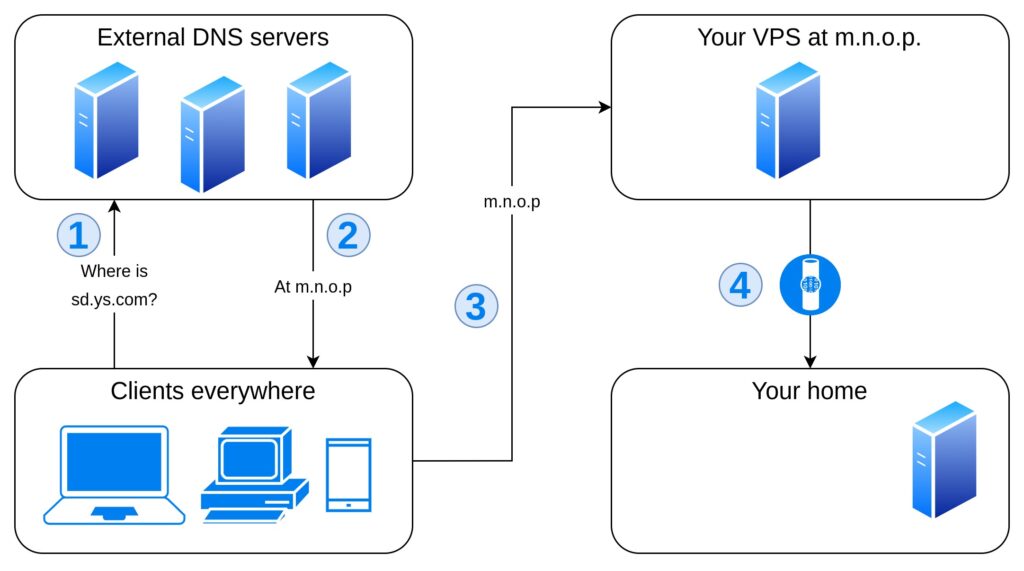
What if your ISP puts you behind a NAT? This is all but uncommon, given the shortage of IPv4 addresses, and while it may protect your privacy as a client it certainly gets in your way as a server, since clients cannot reach you directly.
Here is where a VPN comes in handy: a tun or type virtual private network can link your home server to your VPS in a secure way, so that the VPS may redirect incoming traffic for subdomain.yoursite.com to your home server at its virtually local address.
You can follow these instruction without a public static IP address, without a public dynamic IP address, without any nameserver and without setting up port forwarding on your home router. All you need is a VPS and a DNS record associating its public static address with your (sub)domain.
- Register a wildcard DNS record with your domain provider to make all subdomains of yoursite.com point to your VPS. Just follow these instructions, with the public static IP of your VPS (you may run
ifconfigon the VPS to get it). - Run a VPN server on your VPS and VPN client on your home server. You may choose any VPS you like, but if you need help you can read below how to set up OpenVPN. Your home server must always be assigned the same IP address by the VPN server.
- Configure the reverse proxy on your VPS to forward traffic for subdomain to the VPN IP address of your home server. As an example, you may take a look here, eliminating the lines dealing with the resolver and replacing the subdomain to resolve with the IP address of your home server.
- Configure a web server on your home server, obtaining a certificate for the subdomain.
How to set up OpenVPN
OpenVPN is an opensource free full-featured SSL VPN. The company which developed and maintains it offers many other products, including an easier to manage business VPN called Access Server. This tutorial however will cover the community version of OpenVPN, which may be less user-friendly but is open-srouce and free to use.
### === On both your VPS and home server === ###
# Install openvpn
sudo apt install openvpn
### === On a trusted and secure machine === ###
# You can generate your pki in any other way. Just make sure that the server and the clients certificate requests are signed by the same CA.
# Install easy-rsa
sudo apt install openvpn easy-rsa
# Move to easy-rsa folder
cd /usr/share/easy-rsa
./easyrsa init-pki # Initialize the primary key infrastructure (PKI)
./easyrsa build-ca nopass # Create a CA root certificate and key (it will be self-signed and you will use it to sign other certificates)
./easyrsa gen-dh # Generate Diffie-Hellman parameters
./easyrsa gen-crl # Generate certificate revocation list
openvpn --genkey --secret pki/tc.key # Generate a static key for TLS encryption
# Generate certificate requests for your VPN server and client(s) and sign them
./easyrsa gen-req myservername nopass
./easyrsa gen-req homeserver nopass
./easyrsa sign-req server myservername
./easyrsa sign-req client homeserver
# Set SSH so that you have root access from your trusted PC (generate a key pair on your PC and add it to .ssh/authorized_keys on the target server) and copy certificates and keys in the right places
VPS_SERVER="m.n.o.p" # Replace this with your VPS public static IP address.
HOME_SERVER="w.x.y.z" # Replace this with your home server's IP address on the LAN.
scp pki/{ca.crt,issued/myservername.crt,private/myservername.key,tc.key,dh.pem,crl.pem} root@"$VPS_SERVER":/etc/openvpn/server/
scp pki/{ca.crt,issued/homeserver.crt,private/homeserver.key,tc.key} root@"$HOME_SERVER":/etc/openvpn/client/### === On your VPS === ###
cd /etc/openvpn/server
nano server.conf # See below
mkdir ccd
nano ccd/homeserver # See below
sudo systemctl enable openvpn-server@server.service # OpenVPN server service will start at boot
sudo systemctl start openvpn-server@server.service # Start service now
## == /etc/openvpn/server/server.conf == ##
local m.n.o.p # Replace this with your VPS public static IP address.
port 1194 # You can change this
proto udp
dev-type tun
dev SubdomainVPN # VPN name; feel free to change it
ca ca.crt
cert myservername.crt
key myservername.key
dh dh.pem
auth SHA512
tls-crypt tc.key
topology subnet
server 10.10.0.0 255.255.255.0 # You can change this
server-ipv6 fddd:1194:1194:1194::/64 # You can change this
push "redirect-gateway def1 ipv6 bypass-dhcp"
ifconfig-pool-persist ipp.txt
push "dhcp-option DNS 62.149.128.4"
push "dhcp-option DNS 62.149.132.4"
keepalive 10 120
cipher AES-256-CBC
user nobody
group nogroup
persist-key
persist-tun
status openvpn-status.log
verb 3
crl-verify crl.pem
explicit-exit-notify
# Client configuration directory: to assign static IPs to specific clients
client-config-dir /etc/openvpn/server/ccd
## == /etc/openvpn/server/ccd/homeserver == ##
ifconfig-push 10.10.0.5 255.255.255.0### ===== On your home server ===== ###
cd /etc/openvpn
nano subdomain.conf # See below
# To allow autostart, edit /etc/default/openvpn, find AUTOSTART="all" line and uncomment it. You can also replace "all" with the VPNs you want to start at boot (separated by a single space from each other).
## == /etc/openvpn/subdomain.conf == ##
client
dev-type tun
dev subdomain # VPN name, change it if you wish
proto udp
remote m.n.o.p 1194 # Host and port, same as server configuration
resolv-retry infinite
nobind
persist-tun
remote-cert-tls server
auth SHA512
cipher AES-256-CBC
ignore-unknown-option block-outside-dns
block-outside-dns
verb 3
# Do not redirect all traffic through VPN
pull-filter ignore "redirect-gateway"
# Redirect traffic on 10.10.0.x (VPN local area network) through VPN
route 10.10.0.0 255.255.255.0 vpn_gateway
auth-nocache
<ca>
# Paste ca.crt here
</ca>
<cert>
# Paste homeserver.crt here
</cert>
<key>
# Paste homeserver.key here
</key>
<tls-crypt>
# Paste tc.key here
</tls-crypt>You made it
If you followed these steps you should now be running a public service on a home server. If something went wrong, or a step was unclear or you spotted errors or have suggestions please let me know in the comments section or contact me.